
The Process of Installing ADA Tiles
The use of tactile tiles in various locations is required as part of the Americans with Disabilities Act (ADA). In addition to the ADA, many local, county, and state government agencies also have their own specific laws that require the use of ADA tiles in specific locations to make accessibility easier for everyone.
For example, way-finding surfaces can be very common on university campuses, at train stations, in airports, and around public parks that have walking/jogging trails. These tiles with tactile surfaces and truncated domes are also found at intersections, crosswalks, rail and bus platforms, hospital entrances, retail store entrances, and more.
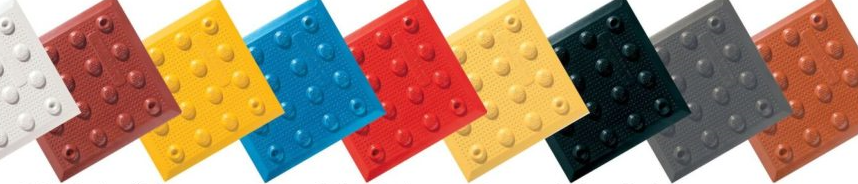
While there is a wide array of colors of ADA tiles, the most popular one is bright yellow. When selecting tiles to install as part of your project, you can choose any color you want—most of the time. In certain states, there are specific color requirements. For instance, in California, you must use the bright yellow tactile surface tiles.
If there is no color requirement, you still need to follow the ADA guidelines for tile installation. The tiles must be of a contrasting color compared to the color of the surface. If the surface is asphalt, then you would want a lighter-colored tile. Conversely, if the surface is concrete, then you want a darker-colored tile.
Ultimately, it is your responsibility to review any local, county, state, and federal requirements for ADA tile installation, as well as the ADA guidelines to ensure compliance.
What Are the Different Tile Installation Options?
There are two general installation options you can choose from—Cast-in-Place or Surface Applied. Each option has its advantages which are worth your time to review to determine which type of tiles would be best suited for your project and current needs.
Cast-in-Place Tile Installation
Cast-in-Place tile installation is setting the tiles into wet concrete so the tiles can be made level with the ground surface. The physical characteristics of the surface material should be specified in the project documents.
If the tiles are being installed at a street curb or intersection, they could require a slope from the elevated sidewalk surface to the street level. The grade of the slope will be specified in the ADA guidelines. Furthermore, the placement of the tiles will vary but should adhere to the ADA guidelines.
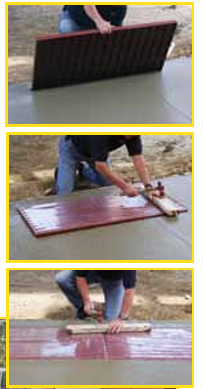
Prior to setting the tiles into the surface material, it should be freshly poured and finished level for a true and smooth finish. When working with concrete, you will need to carefully pound the tile into the wet concrete using a rubber mallet and a piece of wood to shield the tactile surface from damage.
You need to pound the tile into the concrete so that all air underneath it has been relaxed and the tile elevation is consistent with the project drawings and ADA specifications. Make sure to make any adjustments to the placement of the tile before the concrete sets.
When you are satisfied the tile is in the right location, place one cinder block onto each of the ends to hold the tile in place while the concrete cures. You will need to allow the concrete to fully cure and set before walking on the tactile tiles.
If you are using quick-drying concrete, the tactile surface could be ready to walk on in as little as four hours. However, it is your responsibility to ensure proper concrete curing occurs so the tiles are properly secured and set into the concrete.
Surface Applied Tile Installation
As the name implies, Surface Applied tile installation is using Surface Mount tiles and placing these directly onto the concrete surface. Surface Mount tiles are well-suited for projects where the concrete is fairly fresh and does not need to be replaced.
Rather than having to tear out the concrete and pour new wet concrete, as is required with Cast-in-Place tiles, tile installation is much faster and easier using the Surface Applied method.
Prior to installing the tiles, you want to clean the surface to remove all dirt, dust, debris, grease, oil, etc. It is okay if the surface has staining on it. This will not affect the installation procedure. After cleaning the surface area, allow the surface to fully dry and be free of any moisture.
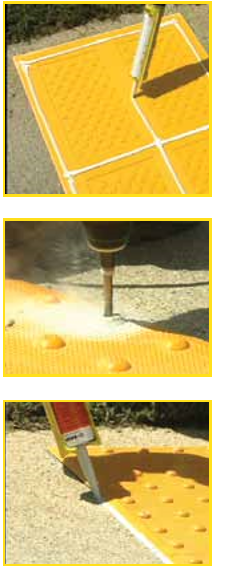
The tactile panel will easily adhere to the existing pre-cleaned surface using the following steps. You will want to lay out the tile on the ground and confirm the installation location. Next, drill out the holes needed to secure the tile fasteners in place. Each hole should be at least two inches deep. Do not fasten the tile to the surface just yet.
After the holes have been drilled, clean away any concrete dust. Flip the tile over so the bottom is facing upward. Apply a sufficient amount of adhesive onto the bottom of the tile. You want a bead of about three-eighths of an inch of adhesive.
Apply the adhesive around the outside of the frame on the smooth part, as well as on the smooth part on the interior of the tile to create small rectangular “blocks.” Carefully flip the tile back over and set it into the desired installation location. Press firmly down on the tile so that the adhesive can spread.
Make any adjustments prior to fastening the tile to the ground. Once satisfied with the placement, place fasteners in the pre-drilled holes. Using a rubber mallet, hammer into place. Last, caulk around the perimeter of the entire tile using BASF NP1 or an equivalent-rated caulk. Allow the adhesive and caulk time to fully cure before walking on the tile.
Can Surface Mount ADA Tiles Be Installed on Asphalt?
Due to the instability of asphalt, it is not recommended to use the Surface Applied installation method and Surface Mount tiles. If you need to installed tactile tiles in areas where asphalt is the primary surface covering, you will want to use either Cast-in-Place or Replaceable Cast-in-Place tiles.
This process involves removing the asphalt in the location where you want to install the tiles. You do not have to remove all of the asphalt, but just enough so that the tile will fit into the ground and meet elevation consistency requirements.
Once the asphalt has been removed, you will pour a concrete footer into the location. Next, you will level the concrete, and then install the tile using the Cast-in-Place method. You will need to let the concrete fully cure and keep the area blocked off until it does.
Is There a Different Tile Installation Method for Cast-in-Place Replaceable Tiles?
No, for installing replaceable Cast-in-Place tactile tiles in concrete or asphalt, the installation process is similar to the Cast-in-Place method. The only difference is that when the tile wears out, or if it is accidentally damaged, you do not need to remove the entire tile to replace it.
Rather, you just order a replacement cover for the tile. The cover is made up of removable and replaceable tiles. It is held in place using special fasteners. Having this flexibility is beneficial, especially if you know the tiles will wear out long before the concrete or asphalt surface needs to be replaced.
Another reason some projects use replaceable tiles is when they are using a graphic tile system. A graphic tile system is where the tiles are customized with the graphics or logo you want. For instance, they could be used for advertising local restaurants, conveying information such as a handicap-accessible street crossing, and so on.
For further information and full details about Cast-in-Place and Surface Applied tile installation methods, or help finding the right tactile tiles for your project, please feel free to contact ADA Solutions at 1-800-372-0519 today!
We offer a wide array of customizable tile solutions, as well as radius systems, iron dome tiles, glow-dome tiles, and way-finding surfaces.

